The FinalKey text-mode interface
Your FinalKey can work with a serial-terminal program, eliminating the need to install custom software.
- Overview
- The FinalKey text-mode interface
- Connecting
- Logging in
- Help screens
- FinalKey prompt
- Accounts
- What is an account
- What are actions
- How to use accounts
- Repeating actions
- Creating a new account
- Deleting an account
- Listing
- Searching
- Keyboard Layouts
- Banner Text
- Backup
- Create backup from a FinalKey
- Restore backup onto a FinalKey
- Change password
- Format
- Quickly erase whole line
- Extra paranoid master password (scramble)
- Firmware Update
Connecting
Before you can use your FinalKey, you need to connect to it.
OSX and Windows users first need to determine the port-name assigned to their FinalKey.
Linux users can type finalkey connect.
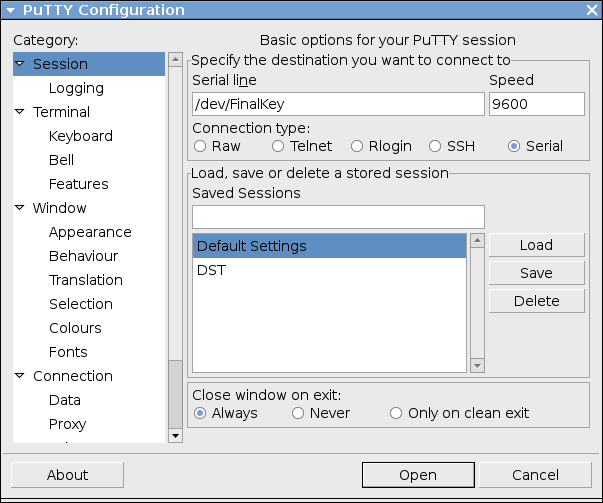
Connecting with Putty (Linux/OSX/Windows)
After selecting "Serial" and entering the correct port name, click "Open" to connect.
Connecting with GNU Screen (Linux/OSX)
screen PORTNAME 9600screen /dev/ttyACM0 9600screen /dev/tty.usbmodem221 9600Connecting with Minicom (Linux/OSX)
minicom -D PORTNAME -8 -b 9600minicom -D /dev/FinalKey -8 -b 9600minicom -D /dev/tty.usbmodem221 -8 -b 9600Speed: 9600 Baud
Data bits: 8
Stop bits: 1
Parity: None
Flow control: XON/XOFF
The serial-terminal should have local-echo turned off.
Logging in
Push button
Enter password


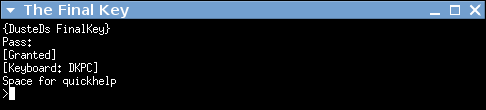
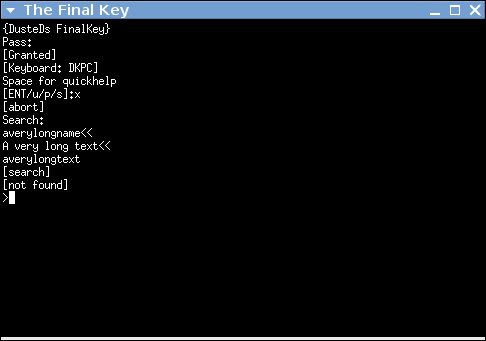
When you connect, the FinalKey blinks and you are greeted with "The FinalKey"
The # character indicates that the button on the FinalKey should be pressed to continue.
When the button has been pressed, the banner is shown and you are prompted for a password.
After entering the correct password, you are granted access.
 To the top
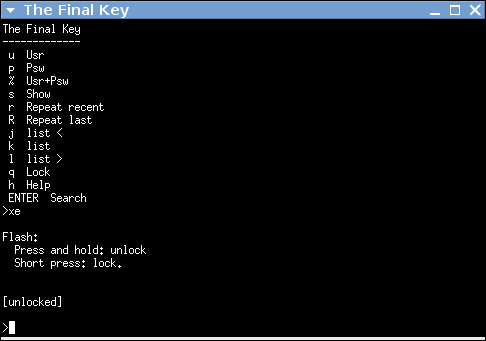
Help screens
Spacebar = Show Quick Help.
h = Show more help
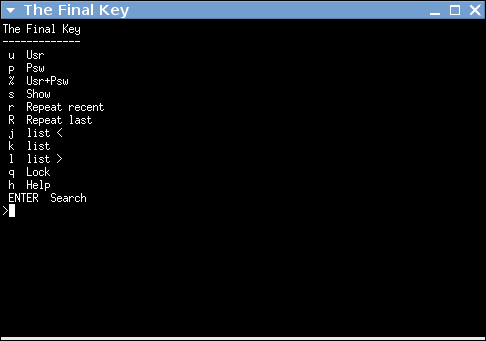
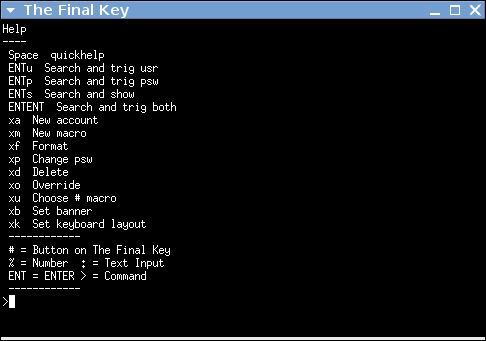
There are two help-screens built into The FinalKey, they show all commands, and this page is just a more detailed explanation.
FinalKey prompt
The FinalKey prompt changes according to the kind of input it needs.
# = FinalKey-button press expected, short press to confirm/execute, hold to abort.
% = The FinalKey expects a number (an account number or password length).
: = Text expected, name, password or search-term, end with enter, abort with tab.
> = Command or account-number.
Accounts
NUMBER = Full trigger
u NUMBER = Trigger only user-name
p NUMBER = Trigger only password
s NUMBER = Show account user-name and password on screen
What is an account
Accounts are made up of the following parts
- An account number - Assigned to the it by the FinalKey
- A title - The "Name" of the account, shown in the list, you can search for it.
- A username - The named used to log-in to the account.
- A seperator key (usually the tabulator key)
- A password - The password used to log-in to the account.
- An account is always referred to by its number (a hexadecimal, lower-case number between 00 and ff).
What are actions
- An account is used by triggering the FinalKey to execute an action on it
- The light is blinking when an action is triggered
- Press the button when the light is blinking to execute the action
- If the button is not pressed within 30 seconds, the action is aborted
- If the button is held-down until the blinking stops, the action is aborted
How to use accounts
- Find account that you want to use.
- Trigger an action on it
- Focus the text-input where the text should be typed (like the user-name or password box) and push the button on The FinalKey.
Trigger - Full Login
The FinalKey types the user-name, then the separator, then the password and finally enter.
Type the account number to trigger the "Full Login" action on an account.
Trigger - User-name Only
The FinalKey types the user-name, and nothing else.
Press u, followed by the account number, to trigger the user-name action on an account.
Trigger - Password Only
The FinalKey types the password, and nothing else.
Press p, followed by the account number, to trigger the user-name action on an account.
Trigger - Show account info
The FinalKey displays the user-name and Password for an account.
Press s, followed by the account number, to trigger the show action on an account.
Show examples of account-actions
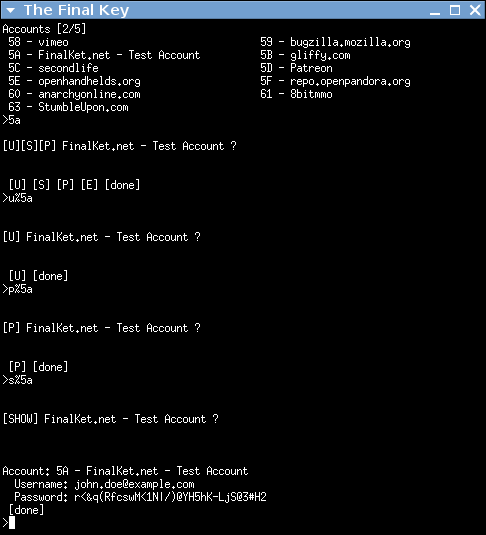
The image above show five different things
- A listing - At the > prompt, k was typed, this cleared the screen and show the list seen.
- A full trigger - At the > prompt, 5a (the account number for FinalKey.net - Test Account) was typed
- A username-only trigger - At the > prompt u was typed, the prompt changed to >u% and 5a was typed
- A password-only trigger - At the > prompt p was typed, the prompt changed to >p% and 5a was typed
- A show-account trigger - At the > prompt s was typed, the prompt changed to >s% and the account number, 5a was typed
The account is number 58.
At the > prompt, type 5 and 8Password-trigger on the secondlife account from the picture
The account is number 5c.
At the > prompt, type p, the prompt will write p% then type and 5 and c
Repeating actions
r = List four latest actions, select with 1 to 4
R = Repeat latest action
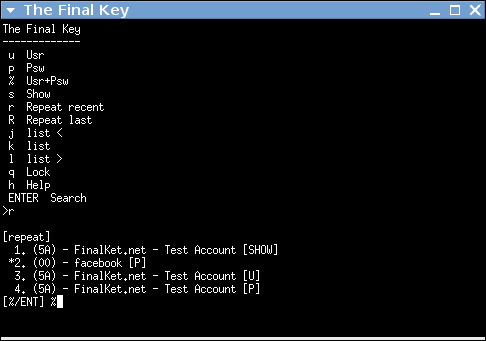
To repeat the last performed action, press shift+r (Uppercase R).
To bring up the 4 latest performed actions, press r (Lowercase r) and press the number of the action you wish to perform, or press ENTER to repeat the last used.
To the top
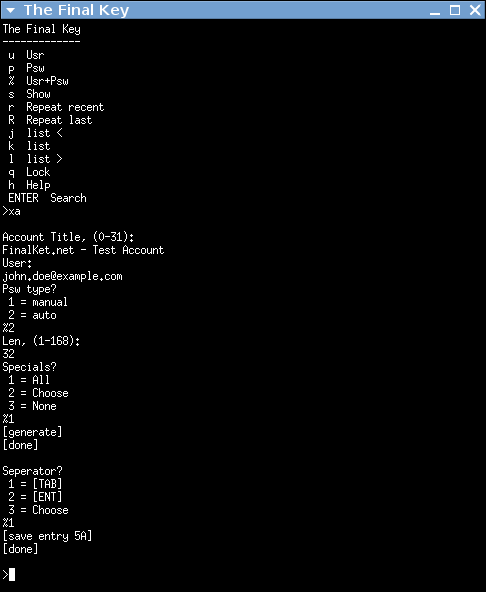
Creating a new account
xa = Create new account
An account is:
- Title, eg. "ThatWebsite.com", tells what it is used for
- User name
- Separator, key to press between username (usually the Tabulator).
- password
Type xa to begin.
The led will blink, press button to continue.
Follow instructions on screen, press "tab" at any time to abort the account-creation.
When asked about password-type, you can choose either manual or auto,
manual allows you to enter an already existing password, however, for security purposes,
it is recommended to use the auto option and select as long a password as is allowed in the service.
Most websites will only allow up to 16 characters, check this out before creating your account.
The automatic password generator will create a random password, remember that a password is only
as secure as it is long.
To the top
Deleting an account
Warning! Deletes an account and overwrites it with random data.
xd NUMBER = delete account
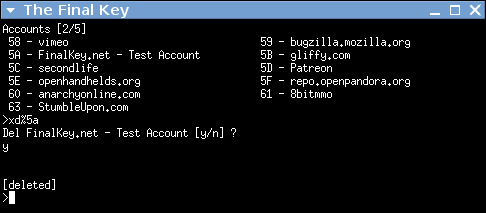
Deleting an account is done by pressing xd, followed by the account number, for example: xd00.
You will be asked to press y to confirm, and then the light will blink and you need to press the button on the FinalKey to allow the deletion.
To the top
Listing
j = Previous page
k = Show current page
l = Next Page
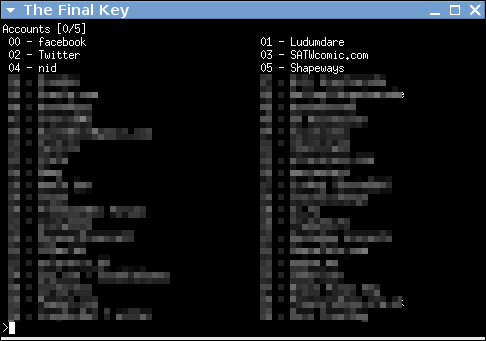
Show what you have stored on your FinalKey.
To the top
Searching
Enter = Enter search-mode
Enter (in search mode) = Trigger Full Login
u (in search mode) = Trigger User-name
p (in search mode) = Trigger Password
s (in search mode) = Trigger Show account
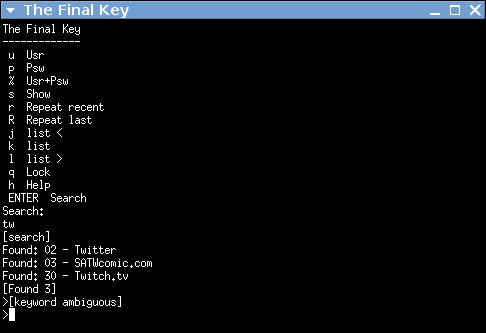
To search, first enter search-mode by pressing enter,
then select the action you wish performed on the result.
If the search returns more than one account, the results are displayed, and nothing more will happen.
Examples:
    Search for twitter, trigger for full login:
    ENTER ENTER twit ENTER

    Search for facebook, trigger for password only:
    ENTER p face ENTER

    Search for instagram, trigger for username only:
    ENTER u insta ENTER

    Search for netflix, trigger to show the details:
    ENTER s flix ENTER
Keyboard Layouts
xk = Set keyboard layout
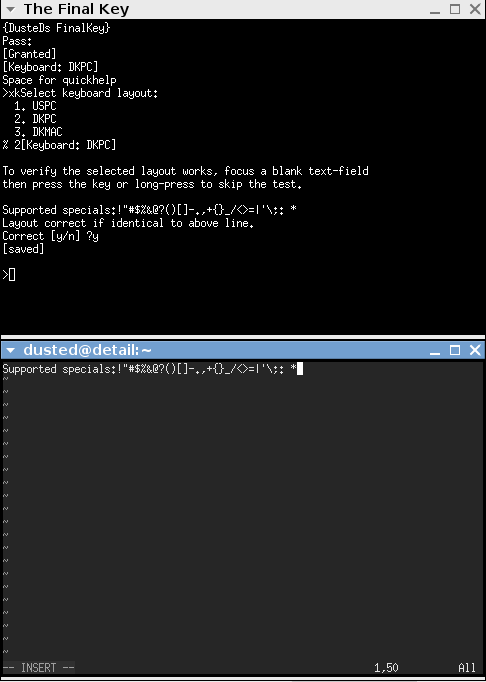
The FinalKey was designed to be used with multiple computers, and, because it works as a keyboard, the key-codes it send needs to match the keyboard-layout of the computer.
For the US American ISO standard this is not a problem, the English layout will work on any IBM-Compatible Apple computer, using the US-English keyboard layout.
For other countries, a separate layout is needed for IBM compatibles and Apple.
Pressing xk brings up the list of available layouts, pressing the number of the desired layout.
The light starts blinking, and you now have the choice to test if the layout is indeed producing the correct result.
Open a text-editor, and press the button to verify that the characters printed in the terminal match those typed in the text-document.
To the top
Banner Text
xb = Set banner text
The banner text is the only unencrypted information on the FinalKey, it is displayed when a connection is made, before the device is unlocked by the master password.
The purpose of the banner text, is to identify the FinalKey, this can be any text you want.
When you receive a new final-key, the banner-text is used to show you the password.
To the top
Backup
These commands are executed from the operating system terminal, not The FinalKey terminal.
OSX Users need to compile the backup program from source, or use the GUI.
Windows users need to use the FinalKey GUI for backups.
To backup your FinalKey, close any connections to it and unplug the USB cable from the device.
Type: finalkey backup to see the instructions.
Example, to backup: finalkey backup mybackup-2015-03-08
Example, to restore: finalkey restore mybackup-2015-03-08
The backup file is encrypted using the same AES256 encryption as the flash-memory on The FinalKey, but since it may be possible to steal the backup file and start brute-force attacks against it, it is very highly recommended that backups are taken using trusted computers and that the backup file is stored on off-line media, such as a USB flash drive in a safe location.
Create backup from a FinalKey
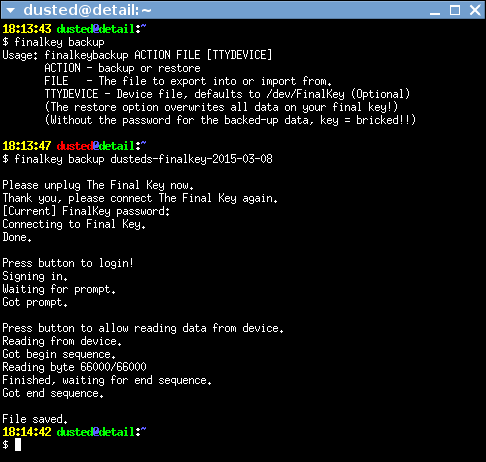
Close all connections to FinalKey and type in a terminal:
finalkey backup name-of-backup-file
The password you need to enter, is the password which you are using to unlock your FinalKey.
Restore backup onto a FinalKey
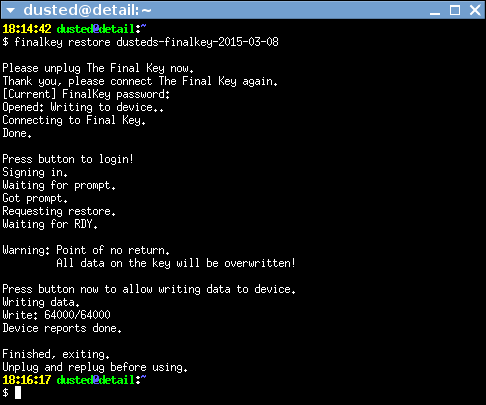
Close all connections to FinalKey and type in a terminal:
finalkey restore name-of-backup-file
Note that you will be asked to give a password, the password that you need to enter is the password that will unlock the connected FinalKey, this may or may not be the same password as was used when the backup was taken.
For example, if you have a FinalKey which is protected by the password "yoigCevHevt8evEgToHy7ijufhoshult" and you take a backup of that, then by accident you drop your FinalKey into a volcano, and get a new one, the new one has a pre-set password of "changeme". When you are asked by the backup-program to enter a password, you should enter "changeme". When the backup is completed the password to unlock the key is no longer "changeme", it is your old password "yoigCevHevt8evEgToHy7ijufhoshult".
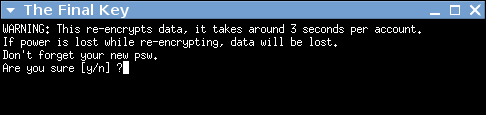
Change password
Warning!
Changing the password cause the FinalKey to decrypt and encrypt the complete storage, this operations takes a while, and if power is lost during the process, the accounts that were not encrypted yet will become unavailable! Be sure to take a backup before you change the password!
xp = Change password
Type xp to change password.
When the password has been changed, login again with your new password.
To the top
Format
Warning!
Formatting will overwrite all storage with random data, everything will be lost, do not proceed unless you are absolutely sure!
xf = Format the final key data storage
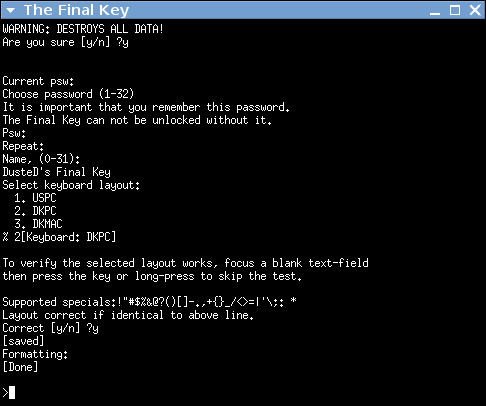
- Press xf, answer y to continue, press button to confirm.
- Enter the current password.
- Enter password that should be used to unlock the device in the future, repeat.
- Enter a Banner text (up to 31 characters).
- Select a keyboard layout (this can be changed later).
Quickly erase whole line
For the lazy
If you have written a part of a password, or other text and want to erase the whole thing, instead of pressing a lot of times on backspace, you can press once on the FinalKey button, the LED will light up, then press once on backspace, the LED turns off.
Extra paranoid master password (scramble)
This feature should only be used by advanced users.
This feature is ONLY for scrambling the master-password for your FinalKey, it is not useful for anything else.
If you want technical info about this feature, check Security section.
The scramble feature adds some extra security aginst the situaion where an attacker has your FinalKey (or backup-file) and also knows your master-password. Scrambling merges randomness into your master-password according to a pattern of button-presses chosen by you.
The scramble feature potentially increases security:
- It adds information to the password which can not be detected from the PC. An attacker who have obtained the password will not know where, and how many times the FinalKey key was pressed.
- Potentially results in values within the password that do not corrospond to a printable character, meaning an attacker who tries to brute-force a stolen backup file now need to consider that not only printable keys can be part of the password, but all byte values between 0 and 255.
- Scramble increases the possible different values in the key from 92 to 255, meaning a the key-range now goes to 32^255 instead of 32^92.
If the backspace key is pressed when scramble is active, the the whole text-string is erased and scramble is turned off.
Imagine your master password is the rather unsafe:
my2HorsesDucks3CatIsSickAt8
If you want a more security to it, you would pause typing to press the button a few times and places, let's represent it like this:
my{1}2Hors{3}esDucks{4}3CatIsSi{2}ckAt8
Let the {number} represent that during the entry of the password, you pause from typing, and press The FinalKey button the number of times, so when setting the master password (during format, or password-change) you:
- type "my" and press the button once.
- type 2Hors, press the button three times.
- type esDucks, press the button four times.
- type 3CatIsSi, press the button two times.
- type ckAt8, press enter.
Each time you want to unlock your key, you then need to press the button the correct number of times, at the correct places, effictively making the buttonpresses part of the password, and those can't be sniffed, since the device will not report to the PC that anything happened.
Do not only push the button in obvious places like between two words, that's too easy to guess.
Firmware Update
Firmware update is for advanced users only!
Data may be lost, your FinalKey may be bricked!
Make sure that you have backups of your database before proceeding.
Make sure that any firmware you upload will be able to unlock the bootloader!
xe = Show flash-menu
To flash The FinalKey you need download the special version of the Arduino IDE, and build the source-code (a dedicated update-kit may be provided in the future).
To protect your FinalKey against unauthorized firmware flashing, the bootloader (the piece of software which will either run the firmware, or flash the device) checks if the device is locked at power-on.
Flash-mode can only be entered if the device is unlocked.
This protects the device against being flashed with malicious firmware either when connected to a compromised computer or if it is physically stolen. However, it does NOT protect against someone
disassembling the device and write new firmware using the ISP pins on the chip itself, however, if that happens, chances are that you can see that your FinalKey has been tampered with.
Press xe to enter the flash menu.
Unlock flashmode: Press and hold the button until the text [unlocked] appear.
Lock flashmode: Press and release the button, the text [locked] appea.
To flash the FinalKey:
- Unlock flash mode.
- Close any connections and unplug the FinalKey.
- Press and hold the button on the FinalKey and insert the connector.
- The light should blink rapidly, keep the button pressed until the light stops blinking and stays on.
- In the Arduino software, select "FinalKey" in the "Board" menu, open t he firmware code and upload the new firmware.
- When the upload is complete, unplug the FinalKey, and re-connect it.
- Log in to your FinalKey and lock the bootloader by typing xe and do a short press on the button.